ESP32 lvgl touch display control multiple relay
To control a 4-channel relay using an ESP32 with a touch display (via LVGL library), you can integrate the relay control with a graphical user interface (GUI).

Hardware Setup
- ESP32 Board: Ensure your ESP32 is connected to a compatible display (e.g., an SPI-based TFT or similar).
- Touch Display: Use a display that supports LVGL and includes a touch panel (e.g., ILI9341 with XPT2046 touch controller).
- 4-Channel Relay: Connect the relay inputs to GPIO pins of the ESP32, ensuring they are correctly powered (usually 5V for most relay modules).
- Wiring:
- Connect relay IN1, IN2, IN3, IN4 to ESP32 GPIOs (e.g., 25, 26, 27, 14).
- Provide a common ground between the ESP32 and the relay module.
Software Setup
Install LVGL:
- Use the LVGL library to create a GUI for controlling the relays.
- Install the library using PlatformIO or Arduino Library Manager.
Touch Driver:
- Ensure the correct driver (e.g., XPT2046) is configured in your LVGL setup.
    #include <lvgl.h>
#include <TFT_eSPI.h> // TFT library for SPI displays
#include <Wire.h>

// Define relay GPIO pins
#define RELAY1_PIN 25
#define RELAY2_PIN 26
#define RELAY3_PIN 27
#define RELAY4_PIN 14

TFT_eSPI tft = TFT_eSPI(); // Initialize display
lv_disp_draw_buf_t draw_buf;
lv_color_t buf[LV_HOR_RES_MAX * 10]; // Display buffer

// Function to control relays
void toggle_relay(uint8_t relay, bool state) {
  digitalWrite(relay, state ? LOW : HIGH); // Relay logic: LOW = ON, HIGH = OFF
}

// Callback functions for buttons
void btn_relay1_event_cb(lv_event_t *e) {
  static bool state = false;
  state = !state;
  toggle_relay(RELAY1_PIN, state);
}

void btn_relay2_event_cb(lv_event_t *e) {
  static bool state = false;
  state = !state;
  toggle_relay(RELAY2_PIN, state);
}

void btn_relay3_event_cb(lv_event_t *e) {
  static bool state = false;
  state = !state;
  toggle_relay(RELAY3_PIN, state);
}

void btn_relay4_event_cb(lv_event_t *e) {
  static bool state = false;
  state = !state;
  toggle_relay(RELAY4_PIN, state);
}

void setup() {
  Serial.begin(115200);

  // Initialize relay pins
  pinMode(RELAY1_PIN, OUTPUT);
  pinMode(RELAY2_PIN, OUTPUT);
  pinMode(RELAY3_PIN, OUTPUT);
  pinMode(RELAY4_PIN, OUTPUT);
  toggle_relay(RELAY1_PIN, false);
  toggle_relay(RELAY2_PIN, false);
  toggle_relay(RELAY3_PIN, false);
  toggle_relay(RELAY4_PIN, false);

  // Initialize display
  tft.begin();
  tft.setRotation(1);

  // Initialize LVGL
  lv_init();
  lv_disp_draw_buf_init(&draw_buf, buf, NULL, LV_HOR_RES_MAX * 10);

  // Set up display driver
  static lv_disp_drv_t disp_drv;
  lv_disp_drv_init(&disp_drv);
  disp_drv.hor_res = 320;
  disp_drv.ver_res = 240;
  disp_drv.flush_cb = [](lv_disp_drv_t *disp, const lv_area_t *area, lv_color_t *color_p) {
    tft.startWrite();
    tft.setAddrWindow(area->x1, area->y1, (area->x2 - area->x1 + 1), (area->y2 - area->y1 + 1));
    tft.pushColors(&color_p->full, (area->x2 - area->x1 + 1) * (area->y2 - area->y1 + 1), true);
    tft.endWrite();
    lv_disp_flush_ready(disp);
  };
  disp_drv.draw_buf = &draw_buf;
  lv_disp_drv_register(&disp_drv);

  // Create buttons
  lv_obj_t *btn1 = lv_btn_create(lv_scr_act());
  lv_obj_set_size(btn1, 80, 40);
  lv_obj_align(btn1, LV_ALIGN_TOP_LEFT, 20, 20);
  lv_obj_t *label1 = lv_label_create(btn1);
  lv_label_set_text(label1, "Relay 1");
  lv_obj_center(label1);
  lv_obj_add_event_cb(btn1, btn_relay1_event_cb, LV_EVENT_CLICKED, NULL);

  lv_obj_t *btn2 = lv_btn_create(lv_scr_act());
  lv_obj_set_size(btn2, 80, 40);
  lv_obj_align(btn2, LV_ALIGN_TOP_LEFT, 120, 20);
  lv_obj_t *label2 = lv_label_create(btn2);
  lv_label_set_text(label2, "Relay 2");
  lv_obj_center(label2);
  lv_obj_add_event_cb(btn2, btn_relay2_event_cb, LV_EVENT_CLICKED, NULL);

  lv_obj_t *btn3 = lv_btn_create(lv_scr_act());
  lv_obj_set_size(btn3, 80, 40);
  lv_obj_align(btn3, LV_ALIGN_TOP_LEFT, 20, 80);
  lv_obj_t *label3 = lv_label_create(btn3);
  lv_label_set_text(label3, "Relay 3");
  lv_obj_center(label3);
  lv_obj_add_event_cb(btn3, btn_relay3_event_cb, LV_EVENT_CLICKED, NULL);

  lv_obj_t *btn4 = lv_btn_create(lv_scr_act());
  lv_obj_set_size(btn4, 80, 40);
  lv_obj_align(btn4, LV_ALIGN_TOP_LEFT, 120, 80);
  lv_obj_t *label4 = lv_label_create(btn4);
  lv_label_set_text(label4, "Relay 4");
  lv_obj_center(label4);
  lv_obj_add_event_cb(btn4, btn_relay4_event_cb, LV_EVENT_CLICKED, NULL);
}

void loop() {
  lv_timer_handler(); // Handle LVGL tasks
  delay(5);
}

“LVGL is the only framework that I've seen as open source Graphics Library for Microcontrollers. It’s easy to customize, adapts to any design, and the build size is tiny.”
Recent Posts
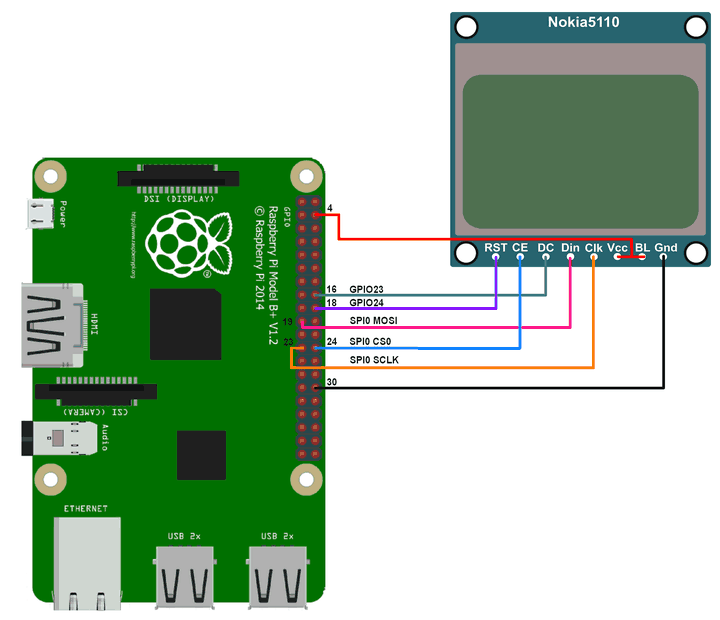
Nokia 5110 LCD with a Raspberry Pi using WiringPi
Nokia 5110 LCD PCD8544 driver with a Raspberry Pi using WiringPi
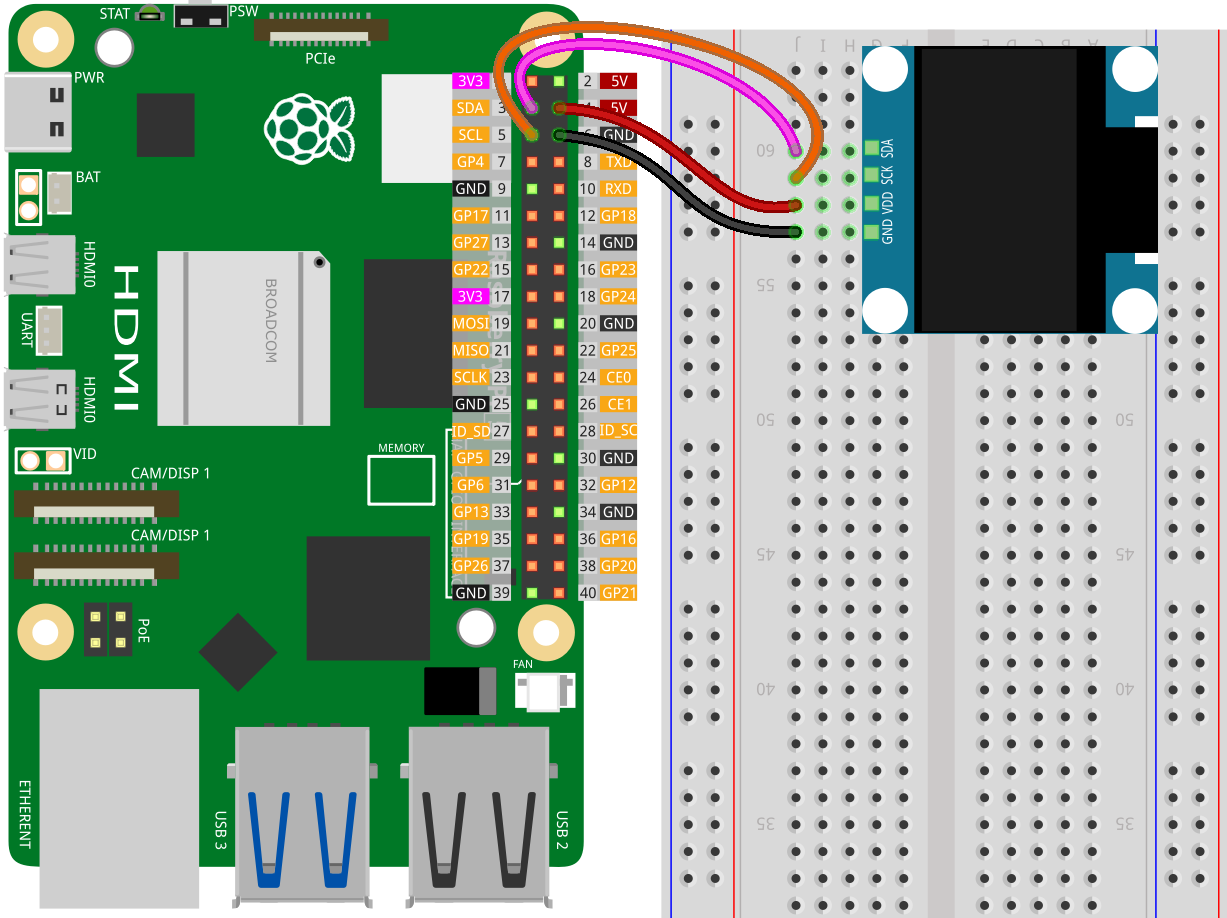
OLED ssd1306 interface with Raspberry Pi using WiringPi
OLED ssd1306 display interface with Raspberry Pi using WiringPi
ESP32 lvgl touch display control multiple relay
To control a 4-channel relay using an ESP32 with a touch display (via LVGL library), you can integrate the relay control with a graphical user interface (GUI).
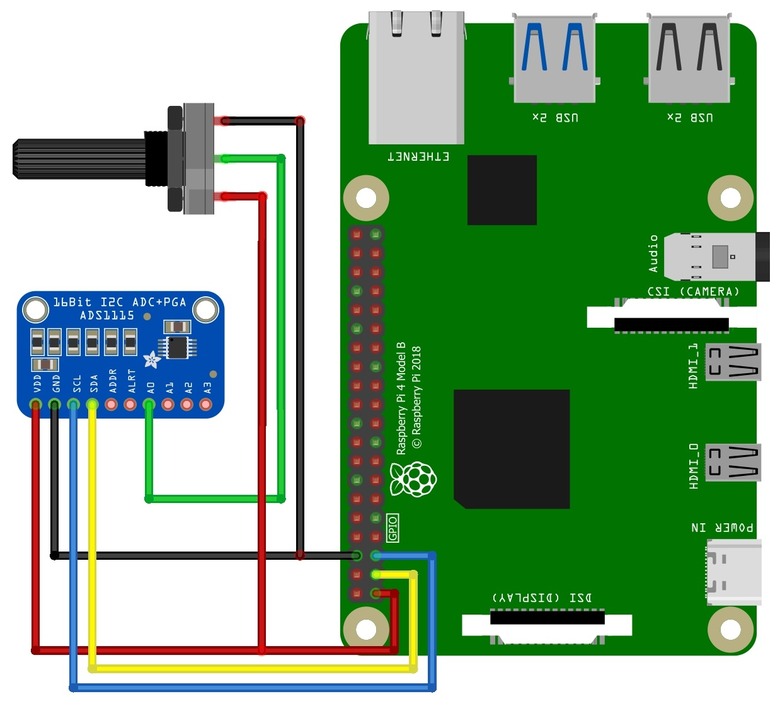
Interface the ADS1115 adc with a Raspberry Pi using WiringPi
Interface the ADS1115 analog-to-digital converter (ADC) with a Raspberry Pi using WiringPi
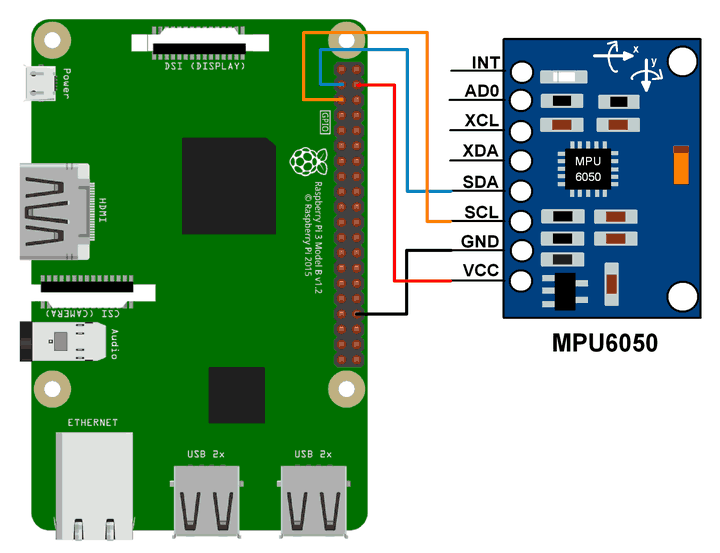
MPU6050 sensor interface with Raspberry Pi using WiringPi
MPU6050 Accelerometer and Gyroscope interface with Raspberry Pi using WiringPi

ESP32 Wifi http get and post method request
To perform HTTP GET and HTTP POST requests on an ESP32, you can use the WiFi and HTTPClient libraries.